[toc]
Introduction
Definitons
PKI: Public Key Infrastructure
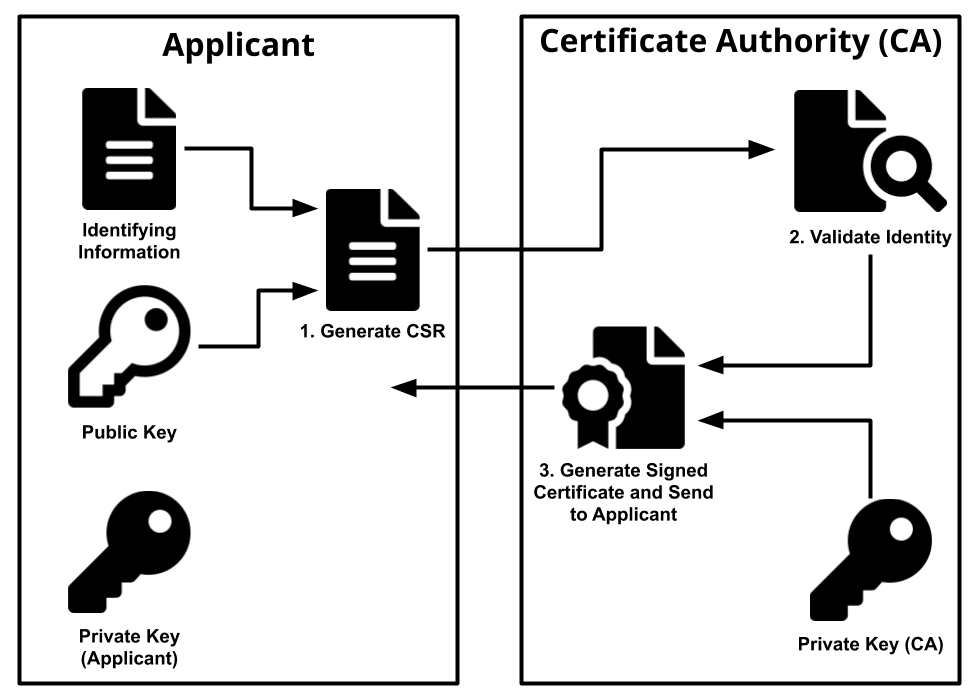
Security architecture where trust is conveyed through the signature of a trusted CA.CA: Certificate Authority
Entity issuing certificates and CRLs.TLS: 传输层安全协议 Transport Layer Security的缩写
SSL: 安全套接字层 Secure Socket Layer的缩写
KEY: 通常指私钥Private key。
CSR: 证书签名请求Certificate Signing Request的缩写,可以简单理解成公钥,生成证书时要把这个提交给权威的证书颁发机构。
CRT: 证书Certificate的缩写
CRL: 证书吊销列表 Certificate Revocation Lists的缩写。
X.509: 是一种证书格式。
对X.509证书来说,认证者总是CA或由CA指定的人,一份X.509证书是一些标准字段的集合,这些字段包含有关用户或设备及其相应公钥的信息。
X.509的证书文件,一般以.crt结尾,根据该文件的内容编码格式,可以分为以下二种格式:
t- PEM (Privacy Enhanced Mail)文本格式,以”—BEGIN—“开头, “—END—“结尾,内容是BASE64编码。Apache和Nginx服务器偏向于使用这种编码格式.
t- DER (Distinguished Encoding Rules)二进制格式,不可读.Java和Windows服务器偏向于使用这种编码格式
OpenSSL 相当于SSL的一个实现,如果把SSL规范看成OO中的接口,那么OpenSSL则认为是接口的实现。接口规范本身是安全没问题的,但是具体实现可能会有不完善的地方,比如之前的”心脏出血”漏洞,就是OpenSSL中的一个bug.
Prerequisites
- You have set up OpenSSL on your machine.
- You have established a process to sign trusted certificates. If you want to have the certificates signed by a certification authority, you have either established your own certification authority or you use an external certification authority. Alternatively, you can sign the generated certificate yourself.
Procedure
0. Edit OpenSSL conf file
1 | cd /etc/pki/tls/ |
CSRを作る際
1 | [req] req_extensions = v3_req |
といった流れで参照します。この設定ファイルを -config で指定して CSR を作ると、CSR に X509v3 Subject Alternative Name:エントリが入ります。
1. Generate Private Key & CSR
1 | openssl req -new -newkey rsa:2048 -nodes -sha256 \ |
View CSR details
1 | openssl req -noout -text -in /etc/pki/tls/server.csr |
2. Signing
- Submit the CSR to the certification authority.
- Alternatively, sign the certificate yourself.
1 | openssl ca -batch \ |
View Certificate’s details
1 | openssl x509 -text -noout -in server.crt |
Other
File Convert
1. Certificate
1 | openssl x509 -in kvm-bmc.crt -out kvm-bmc.pem |
2. Key
Public key or Private key
1 | openssl rsa -in kvm-bmc.key -out kvm-bmc-private.pem |
CAで発行したサーバ証明書を失効にする方法
1 | openssl ca -revoke /etc/pki/CA/newcerts/xxx.pem #replacing the serial number |