iSCSI Target Configuration:
Step 0: Check the disk exists
lsblk
Step 1:Prepare LVM
1 | [root@localhost ~]# vgcreate vgsan /dev/sdb |
Step 2:Install software
yum -y install targetcli
Step 3:Enter the targetcli interface
targetcli
Step 3.1: Configure backstores
/> cd backstores
First thing is to configure a backstorage device from our previously configured lvm volume/backstores> block/ create block1 /dev/vgsan/lvsan
Step 3.2 :Configure IQN
IQN is the unique identifier of each iSCSI-target. IQN follows strict naming convention. It is in iqn.YY-MM.[inverse-DNS]:[target name] format. We have to make to sure to follow this convention, otherwise iqn creation will fail. To create iqn, move to the iscsi section./backstores> cd /iscsi/iscsi> create iqn.2017-09.com.example:rock
Step 3.3 : Create ACL
Create an ACL to allow “client1” to access this target/iscsi/iqn.20....example:rock> tpg1/acls/ create iqn.2017-09.com.example:client1
Step 3.4 : Create LUN
/iscsi/iqn.20....example:rock> tpg1/luns/ create /backstores/block/block1
Now we will go back to targetcli root to get a whole picture of what we created so far.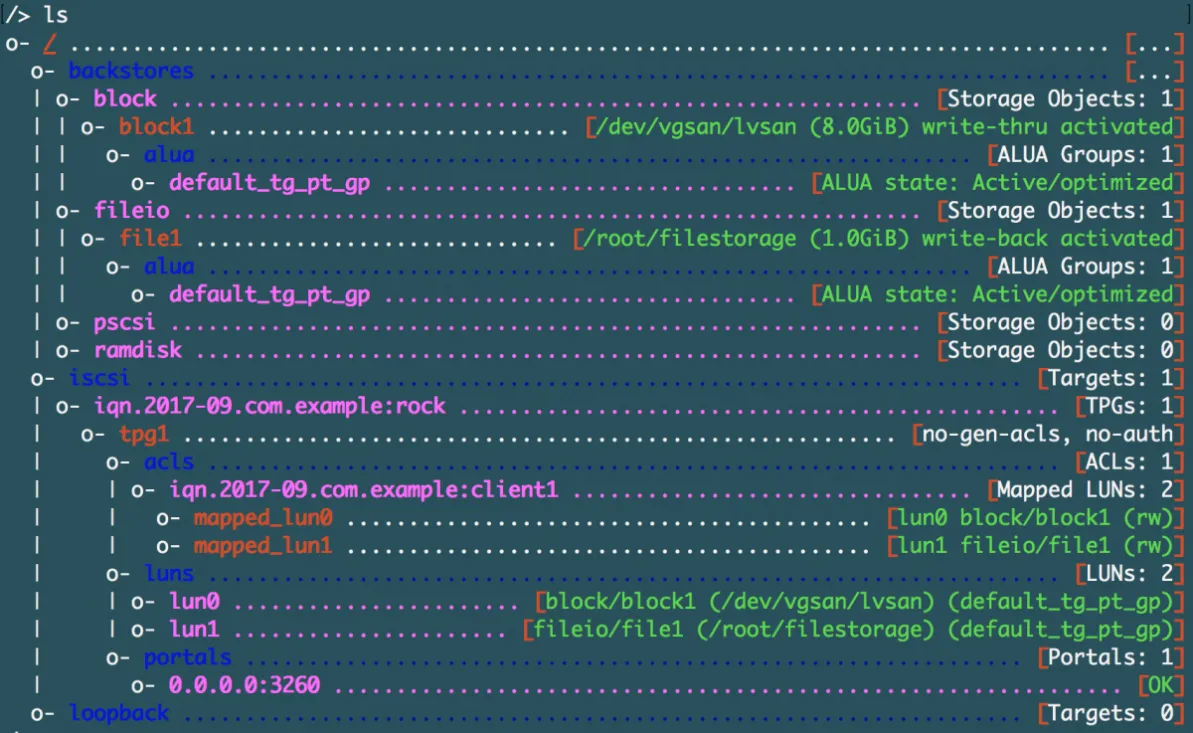
This completes the iscsi setup. Enter the command “exit” to come out of the targetcli prompt. this also saves the configuration./> exit
Step 4: Service & FW Configuration
systemctl start targetsystemctl enable targetfirewall-cmd --add-service=iscsi-target --zone=public --permanentfirewall-cmd --reload
references
https://rmahmood.tech/configuring-iscsi-on-centos-systems/
Initiator(Client) configuration:
Step 0: Check the disk exists
use the “lsblk” command , so later we can see the differencelsblk
Step 1: Install Software
yum -y install iscsi-initiator-utils
Step 2: Edit or View InitiatorName
vi /etc/iscsi/initiatorname.iscsi
restart the iscsid service to configuration change to take effect.systemctl restart iscsid
Step 3: Discover iscsi target
iscsiadm --mode discovery --type sendtargets --portal 192.168.1.56
Step 4: Log into the target
iscsiadm --mode node --targetname iqn.2017-09.com.example:rock --portal 192.168.1.56:3260 --login
Logout Target
iscsiadm --mode node --targetname iqn.2017-09.com.example:rock --portal 192.168.1.56:3260 --logout
Step 5: Specifically check the iscsi devices
lsblk
reference